Monday, August 20, 2012

Dave Tally Is Doing So Well!!!!!!!


Dave Tally, everyone's favorite Community Garden Coordinator was involved in a motocycle accident on Thursday, August 16, 2012.  Dave was compensating on a bad curve and only he and his bike were involved.  Being somewhat of a fanatic about safety, Dave was outfitted in helmet, gloves and protective outer wear.  These precautions probably saved his life and he suffered no road rash.  Our Dave definitely has a higher power watching over him; thank you!

The injuries he did sustain are a total of fractured ribs, badly bruised lungs and a broken collar bone, which was operated on and repaired on Friday. Dave came through like the champ we all know him to be.  I talked with his surgeon on Saturday and he told me Dave's only restriction not lying on that side for approximately six weeks.

Dave was put on a ventilator only to help the healing process by having the machine regulate his breathing so there wouldn't be additional pain. He is holding up well with the pain, the prodding, the pricking and the touching.

On Sunday his sedation was lowered in intervals to wean him off the ventilator.  As of this writing the doctor is still hopeful the tube can come out on Tuesday.

Dave's coloring and all his vitals are good.  I am his constant companion at the moment, but that will change as soon as he can talk and start giving orders verbally instead of my trying to read his fingers.  An example: Dave held up three fingers; three what I asked; he became somewhat agitated, holding up the three fingers again and sort of shaking them at me.  I looked again and the light went on----"W"?  The relief on his face was evident--he wanted water.  Dave gets his water through popsicle sponges he can suck on.  I, unfortunately, am weak to his requests and give him as much as he wants.  Sometimes the nurse comes and takes away my water cup and sponges; luckily Dave is asleep when this happens.

Now you know nearly all I know; his doctors and nursing staff are wonderful to both of us; his care is top-notch.

I have set up a special email account for any of you who want to let Dave know you are thinking of him: phonyup826@hotmail.com.  I will print out the messages for him to read.

Thank all of you for your caring, kind thoughts and considerations,

Georgie for Dave Tally
August 20, 2012

PS  Dave is not idle in the least; he had laid out some ideas with me Thursday morning.  One of his main ideas is an article for his Master Gardener publication about Escalante Community Garden with pictures; he could have done an article on anything, but he chose ECG.  This publication appears online and will be seen and read  allover the US; nice coverage.  I am working on it so as soon as Dave is able he can critque it and we can get it out there.


Monday, August 13, 2012

Nature's Amazing Work is All Around Us!

Escalante Community Garden has so many more lessons in store for us than just planting, weeding, watering for that delicious harvest. It's nature at its finest and all we have to do is look a little closer to find other amazing lessons.

Saturday was Volunteer  Workday in the Garden; we were building a wall around the wildflower area when Donnie, one of our IHELP crew found two "lizard" eggs and gave them to Gretchen Reinhardt, our premier volunteer and teacher .  Gretchen was so excited over them as she planned  to bring them to school on Monday to show her class. She put them somewhere safe and went back to work. A short time later Gretchen went to check on the eggs to make sure they were still okay when suddenly one of them basically exploded and a gecko was born. The gecko immediately slid down a hole in the table it was on and onto the earth below, looking for a safe haven.  Georgie joined Gretchen at this point to find the gecko and take pictures of it and the remaining egg. The result is shown below; that gecko came out of an egg exactly that same size only minutes before this photo was taken--truly, truly amazing.
Now it was time to watch the second egg as everyone wanted to see it hatch. It seemed the gecko was having somewhat of a difficult time so I helped out a bit with a small crack and then to remove the sac it was in and voila, another gecko.  This time I got it on video--incredible.

So many lessons learned, but one of the main ones is, if you don't come to help out in the Garden you miss so many great things plus make friends with some pretty special people, enjoy a potluck and get your picture taken.

Welcome Geckos to Escalante Community Garden,

Dave Tally
Escalante Community Garden Coordinator
August, 2012

Friday, August 3, 2012

Memoirs of Baby Chick (Jesse22) as told to Dave Tally

I arrived at Escalante Community Garden two weeks after Easter. Dave, my new dad named me Jesse 22 (really???), but everyone including Stephen Sparks, Dad's boss calls me Baby Chick. I was a baby and I certainly am a chick.
My first home was this wonderful box with all kinds of paper to keep me warm, a water station and a food station as well as a mirror so I could watch my beautiful self grow. When I got too big for the box, Dave Dad put me into a raised bed in the garden and it was huge for this little chick; I loved it. When I outgrew that I was allowed to run loose in the garden, but I never left the garden; I am also a smart chick.  For the nighttime, an isolation room was built into the chicken coop area for me to sleep.  I was isolated so the big chickens wouldn't pick on me.

Dave Dad hand raised me and I am his special chick.  He taught me tricks and I loved the attention these tricks got me. I became a great educational tool for the kids who came to the garden for classes. I was always gentle with them.
                    
I am no longer a "baby" being now fourteen weeks old. Probably in another month or so I will be laying some fabulous eggs. I have put on my big girl feathers and hang with the other ladies now, but I don't take any guff from them; I can hold my own even if I am the youngest in the coop.  Don't you forget that Ms. Alpha White. I am Baby Chick, the center of my coop.

Of course I will always be Baby Chick or BC to family, friends and fans. My Dave Dad will always be special to me for the wonderful home he provided and the care he took of this little chick.

Please come visit me, Dave Dad and the other girls at the Escalante Community Garden. We love company and I promise we will strut our stuff for you and if Dave Dad lets me, I might even do a trick or two.
                       
Dave Tally
August, 2012


Tuesday, July 31, 2012

Update Your Information

ECG Members:  It's time to update our membership information. Please contact Dave Tally at davet@tempeaction.org to include any new info, but most importantly  confirm your email address whether it is new or not. 
If you are not a member, but would like to be, please send your information to Dave at the above email address and we will add you to all correspondence.

Monday, July 16, 2012

FALL PLANTING IN THE DESERT


 The list of fall veggies is (and I am sure I have forgotten some) is broccoli, Brussel sprouts, cabbage, Chinese cabbage, carrots, cauliflower, chives, collards, cucumber, endive, herbs, kale, kohlrabi, leeks, head lettuce, mustard, onions, parsley, parsnips, peas, radishes, rutabagas, spinach and turnips.


This is a great time to plant a garden in the low desert. It is time to grow a surplus of cool weather veggies. Fall planting season begins September 1st and lasts till November. You can have a beautiful edible vegetable garden. Follow good gardening practices right from the beginning and give your plants a fighting chance against disease and weeds.

Take some time to evaluate where you will be putting your vegetables to make sure there is going to be enough sunlight. You will need at least 6-8 hours of sunlight in your garden spot.

Using a drip system is the best option and takes much of the work out of the day to day tasks.

What is better than having safe, fresh vegetables and herbs you picked from the garden you grew or worked in?

Let me give you the biography of some of the vegetables we will be planting:

RADISH:  The small round radishes are such quick and easy growers. Radishes are members of the same family as broccoli, cabbage, kale and collards (all fall planting veggies). There is a wide variety of radishes from the globe shaped to oblong, hot or mild, red, pink, purple, white or bi-colored. To have a continual harvest, sow a new crop every 10-14 days, until it gets too warm. The fast growing radishes grow quite well in pots and if your space is limited, this is a good option.


The artichoke can be grown almost everywhere in the United States. If you have mild winters (and we do) and mulch well, the artichokes may survive as perennials. It's the artichoke roots that need protection. If we are lucky enough to have the best growing conditions we may be able to harvest artichokes throughout the year. It wouldn't be unusual to harvest 30 artichokes per plant per year. We begin our artichokes with seeds.  Artichokes feed heavily so they must be fertilized. The plants will proper in slightly acidic soil that is rich in organic matter. Full sun is best except in the hot summers, then afternoon shade may be more beneficial. Keep the planting bed moist and water the plants as they grow.
Parsley, parsnips and peas, English, snap and snow can also be planted in your fall desert garden. Look at the start of this article and use what you like to start your garden and enjoy the vegetables of your labors.

Dave Tally
July 16, 2012

VOLUNTEER WORKDAY, SATURDAY JULY 14, 2012

  
 THANKS TO ALL OUR VOLUNTEERS WHO CAME OUT ON A HUMID DAY TO HELP US 
                                                      
SOLARIZE AND READY OUR BEDS FOR FALL PLANTINGS.  YOUR HELP IS GREATLY
APPRECIATED AND YOU'RE ALL FUN TO HANG OUT WITH!

THANKS,  DAVE


Monday, July 9, 2012

SUMMER DESERT BEAUTY


image001.jpg                        
   THE MANY FACES OF THE SUMMER DESERT.
                         
                               Dave Tally, July 9, 2012 

               Beauty is everywhere!          


I love traveling in the desert; the speed at
which the desert landscape can change is
amazing.

Monday, July 2, 2012

AQUAPONICS--HYDROPONICS


Aquaponics is based on productive systems as they are found in nature. It can be loosely described as the combination of aquaculture and hydroponics, hence the origination of the name, aqua-ponics.

Hydroponic systems rely on the careful application of man-made nutrients for the optimum growth of plants. Water needs to be discharged periodically as the salts and chemicals build up in the water becoming toxic to the plants. Aquaculture systems focus on maximizing growth of fish in tanks or pond culture.

The fish are usually heavily stocked in tanks. The high stocking rates mean the tank water becomes polluted with fish effluent, which gives off high concentrations of ammonia. Water has to be discharged in the tank once a day, everyday. This water, if often, pumped into open streams where it pollutes and destroys waterways.

Aquaponics combines both systems and doing so, cancels out the negative aspects of each. Instead of adding toxic chemical solutions to grow plants, aquaponics uses highly nutritious fish effluent that contains almost all the required nutrients for optimum growth. Instead of discharging water, aquaponics uses the plants and the media in which they grown to clean and purify the water, after which it is returned to the fish tank. The water can be used indefinitely and will only need to be replaced when it is lost through transportation and evaporation.


Dave Tally
July 2, 2012

Thursday, May 24, 2012

Lessons from the Phoenix Summer

I know it's not even mid-summer yet, but since the thermometer is reaching far over 100, the garden has started to feel like summer.

As temperatures go up, Phoenix gardeners have to deal with a whole new array of pests, diseases, and issues. Our reward, however, is all the delicious warm season crops that people can't get enough of. Now that the garden is into it's second summer, we've learned a bit about what grows well and what dries out in Phoenix's notorious heat.

ArtichokeAbove is our first artichoke plant. We'll have five more if our most recent transplants survive. It's not really all that exciting...which is why we like it. Artichokes are consistent perennial producers and we haven't had issues with pests, diseases, or anything. Basically, this is a veggie you can plant and ignore until you see a tasty looking artichoke head to snip off.

Beans
Our bean plants have had an interesting year. Here are our scarlet runner beans:
That fence is about 7 feet high so it looks as though they are doing quite well. The only strange part is that the plants have not produced a single bean.

On the other hand, these are our yard-long beans:
These small, but mighty plants have been growing well since the temperatures hit the 100s. Not only have they been growing, but they have been producing a lot of very tasty beans. Very tasty and very strange. Yard long beans look like you would expect, yard long green beans (technically, we have not gotten any over two feet, but we have high hopes).

For those of you who find new veggies intimidating, I have good news. Yard long beans are delicious. They taste similar to a green bean but with just a little more asparagus-y goodness. I would highly suggest planting a number of these in your garden. They don't take up much space and they love the summer heat.
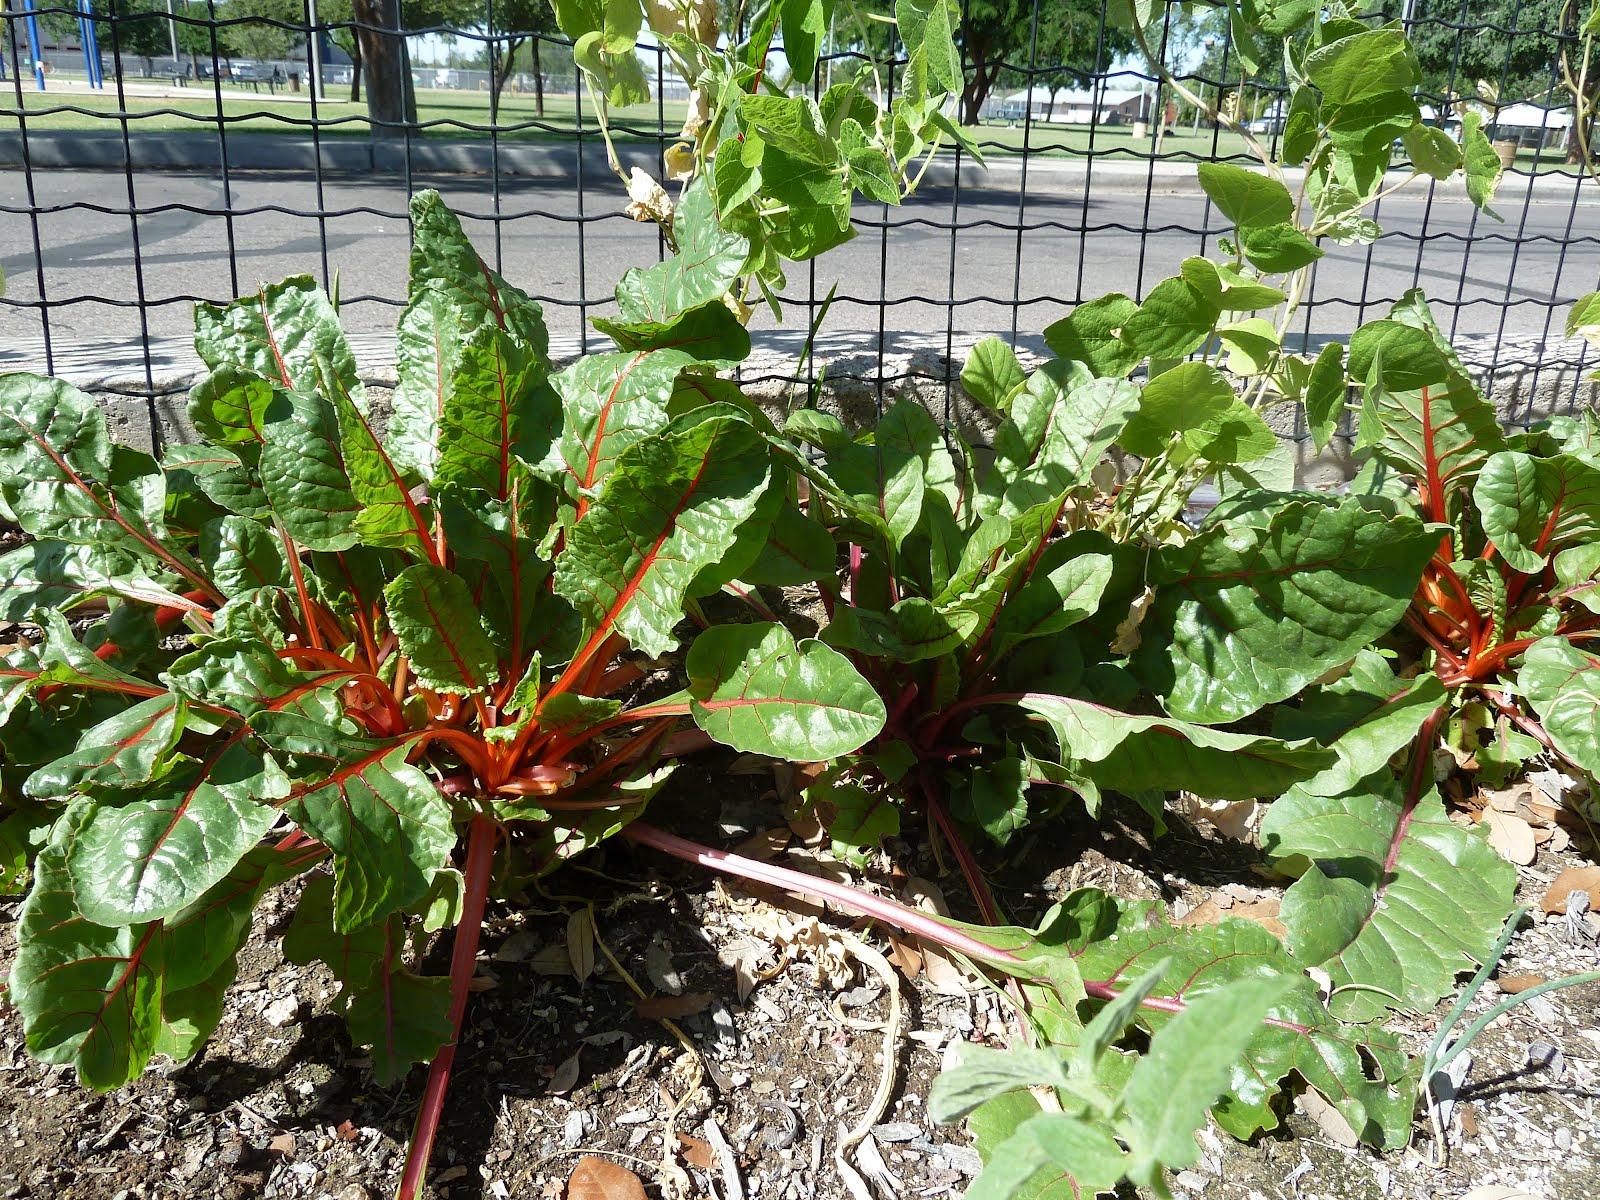
ChardAfter the onslaught of greens we had in the garden over winter, I don't really have an urge for more. However, for those of you needing your greens fix all year long, chard is your best (only) option. All of our other greens have either bolted or dried to a crisp, but chard is still producing.

Corn
We decided to try a bed of sweet corn at the garden. The good news is that our sweet corn grew nice and tall. The bad news is that we tried to squeeze three rows into a 4 foot by 8 foot bed. In the beginning the corn looked just a little crowded. Now, it looks like the corn is imitating a three stooges skit.
Ideally, sweet corn requires a lot of plants to get good ear growth and you don't get that much from an individual plant. Because of this, I would discourage anyone from growing sweet corn in their yard unless they have a LOT of extra space that they need to fill.

Cucumbers
In the spring, I had heard that cucumbers did not grow that well in Phoenix, so we only planted one seedling in the garden.
I am beginning to regret that mistake. As far as individual plants go, this cucumber has been producing more than any other in our garden. On average, I have been pulling one cucumber per day from this plant for the last two weeks.

Melons
Our melon seedlings started so slowly that I worried that we were going to miss out on all the cantaloupe and watermelons this season. Fortunately, the plants have turned around quickly and we've already harvested five watermelons with many more on the way.We are fortunate to have many different melon seeds to try growing. I am becoming a huge fan of the smaller ones. They mature faster, their vines are smaller, and you are more likely to get multiple harvests from them.

Peppers
Being a huge part of the native foodways and Arizona cuisine, I should have guessed that peppers would grow well around here.
They sure are growing well! We've been having a hard time keeping our plants picked. The food bank is giving away multiple pounds of peppers per day.
The one hint I have for those of you looking to grow a few pepper plants is to start small. Don't start trying to grow gigantic bell peppers, that is the one variety we have had no success with. (Ours turn out the size of golf balls.) What you should start out growing is jalapenos, habaneros, or (for those of you who aren't into spicy food) anaheim peppers. In general, plants with smaller peppers will grow faster and you will grow a lot more peppers.

Squash
Here, one of our container sized varieties. The plant is smaller but you don't lose much of your harvest.
In the Midwest, summer squash has a reputation for producing a LOT. They can produce so much that not only do the gardeners get tired of summer squash, but all of the gardeners' neighbors grow tired of it as well.

Fortunately for us, we have lot of neighbors and our summer squash are growing well. We only have 6 plants, but they are growing quickly and we still have not seen much of our arch-nemesis: the squash bug.

Our current method for repelling the squash but is to coat our plants with diotomaceous earth. This organic dust feels like tiny rasor blades and irritates any insects that walk on it. However, it is completely harmless to more thick-skinned organisms (like plants and people!). We have seen a squash bug walk around in it, but we don't think it was enjoying itself.

SunflowersLooking at it from a purely food growing perspective, sunflowers are not worth growing in a garden. But if your goal is to make a 3rd grader stop in his tracks and say "whoa!" then the sunflower is the plant for you.Sunflowers seem to grow quite well in the Valley and have really brightened up our garden. The uses for sunflowers will not fade after the flower is gone either. We have planted climbing beans at the base of our sunflowers so that they can use the flower stalk as a trellis.

Tomatoes
This year, we planted about 50 tomato plants in the garden. Now that the summer has set in, it feels like we have 50 new tomato issues every day. The dry heat is not treating our tomatoes well.
As you can tell from the picture, we do have a lot of nice green tomatoes. My hope is that our plants can hold on for long enough to turn those green tomatoes into red ones. Even if they do, I would hesitate to plant many tomatoes next year. We've had to invest a lot of time into trellising the tomatoes and keeping them healthy. It would be much easier to plant more low maintenance squash and peppers.

Phew! That's all for now from the garden. I think I need to head back out to pick our okra. Did I mention that okra grows quickly around here?

Wednesday, May 9, 2012

Tempe's Food Desert

There is a hot new term that is being used for those of us interested in food, culture, and cities. This term is "food deserts." It has become so common that there is now a Food Desert Awareness Month. Food deserts are defined as areas in the country where there is a shortage in healthy and affordable food sources such as grocery stores and supermarkets. Below is a dramatized and somewhat hilarious depiction of a food desert.
In reality, food deserts are much harder to identify. The first studies to discover this issue researched neighborhoods where families had to do their grocery shopping at a gas station or corner store where they could only buy highly processed or preserved food. Because of this lack of healthy food , these families are more likely to have nutritional issues such as diabetes or hypertension.

In the last year, the USDA has acknowledged the importance of food deserts and has started multiple programs to improve food access in low income areas. In order to properly target food deserts, the USDA has created a definition for a food desert. Beware, government jargon incoming:
"Food deserts" are defined by the United States Department of Agriculture as low-income and low-access census tracts:
  • To qualify as a “low-income community,” a census tract must have either: 1) a poverty rate of 20 percent or higher, OR 2) a median family income at or below 80 percent of the area's median family income;
  • To qualify as a “low-access community,” at least 500 people and/or at least 33 percent of the census tract's population must reside more than one mile from a supermarket or large grocery store (for rural census tracts, the distance is more than 10 miles).
So basically, food deserts are defined as having a shortage of local food options and also lacking the money to drive to farther food resources (gas is expensive).

This all sounds simple enough, so I decided to look up Tempe. Interestingly, there is only one food desert in Tempe and the garden is in the dead center of it.

My apologies about the poor map quality. The desert covers everything inside McClintock, University, Apache, and the canal border with Mesa. The red dot is the garden.

Now, I'm not going to object to any government money that the USDA wants to throw at us, but I feel that the Escalante neighborhood actually has quite a few food resources. Additionally, our neighborhood has the advantage of multiple bus lines, the free Mercury Orbit line, and also the light rail line. So even if you don't own a car, traveling a mile or two to larger grocery stores won't set you back more than a few dollars.

I do not want to argue that there are not food security and health issues in our neighborhood, but I do want to argue that the USDA overlooked some very important "food oasis" in Tempe's food desert:

Haji-Baba International Food
I'm not sure how the USDA missed this place. Located on the south side of Escalante Neighborhood, Haji-Baba is a warehouse of food primarily for nearby restaurants, but the front also acts as a large grocery store. Although this store does not currently have a full produce aisle, I have do doubt that a family could use this store as their primary grocery store.

El Pueblo Meat MarketRight down Apache Dr. from Haji-Baba is El Pueblo. This tiny market is a modern throwback to the all purpose country stores that used to be the backbone of rural areas. Along with having a little of everything, El Pueblo also has a (very) small but relatively diverse and affordable produce section. It's not huge, but the store owners are doing their best with a building about the size of a Wal-Mart checkout aisle.

Bill's Market
Bill's is one of the oldest businesses in the area and has been used by locals for longer than I've been alive. The store has a reasonable selection and is good for anyone in the neighborhood who forgot one or two ingredients. Also, although the USDA would not define it as healthy, the chorizo at Bill's is amazing. The chorizo alone makes Bill's worth visiting.

The India Plaza
Although not exactly inside Escalante Neighborhood, the India Plaza is still right in the middle of food desert. Equipped with a fairly large produce section, the India Plaza is definitely a potential place to get groceries.
It seems that the USDA missed these small, independently run food sources in their census. In defense of the USDA, running a survey of food resources for the whole country is a difficult task and each of these businesses could not feed the neighborhood alone. However, it seems unfair to label a neighborhood serviced by many small independently run businesses as a "food desert." Especially when the alternative is a single large corporate run supermarket that everyone will have to drive to.

Thursday, April 12, 2012

Chicken Wire Beds

So as many of you know, we are always trying to find new ways of making raised beds. I have already tried straw bale beds, tire beds, and the traditional wooden beds. Here's a quick rundown of everything we've tried. You can skip to the last one if you just want to find out about the chicken wire beds.

Used Tire Beds:
We've covered this in a previous post, so I'll keep this short. The advantages are that the tires are free, and don't fall apart. The disadvantages are that they don't look very good and are a fairly odd shape.Wooden beds:
This style of raised bed is the backbone to most community gardens. They are sturdy, long lasting, relatively simple to build, and don't make your garden look like a junkyard.
The big issue with these beds is that they are expensive. Very, very expensive. They are twice as expensive as any other bed.

Straw bale beds:
These beds are quick to assemble and the materials are fairly simple. Note that I did not say inexpensive. Straw bales are simple looking enough, but they are pretty expensive to obtain in a city. Additionally, none of our straw bale beds have lasted a year. The straw based beds fall apart far too quickly. They have provided great compost, but they break down too quickly to be cost and time effective.

Chicken Wire Beds:
Finally, the beds you are here to learn about.

This method was thought up by Raul, one of our most dedicated community members. We built our first bed of this style last year. We wrapped some metal mesh into a circle, linked it to itself with some hog rings. We then padded the inside with a few inches of straw, and filled the inside with dirt. It was about a foot and a half tall and 3 feet in diameter. It was a small investment in time and supplies. We assumed that it would collapse over time because it is just being held together by mesh.
The picture above is a picture of that first bed today, over a year after we first built it. As you can see, it is still standing and not even beginning to show signs of slumping. It is heavily mulched on top so it's hard to tell that it is full of dirt, but trust us there is soil in there.

Since our first experience with these mesh beds was a success, we decided to attempt a larger version. Our second bed was made out of 2.5 ft high metal mesh that was even thinner than the first bed. Also, this bed's diameter was over 4 feet. We then lined the bed with straw and filled it with fresh compost. (So fresh that we kept finding surprises in it, like banana peels)

As you can see, two months have passed and it is still standing. Plus the Early Girl tomatoes we planted are growing like weeds. Since we were once again successful, we decided to really get creative. We knew that if we made the diameter over 5 feet, we would start to have trouble reaching the inner plants, so we decided to attempt a different shape.

I would describe this as kidney bean shaped and it really looks unique. Also, it adds the challenge of a concave area. That is why we invested in some pieces of scrap wood to add a little extra support to our newest bed. So far, after a lot of test watering (and a few scientific test kicks) it feels like it is holding up quite well. We are letting the soil settle a little and then we will be putting transplants into it this Saturday.

At this stage, I am very excited about chicken wire beds. Compared to all the other beds we've built, this has been the least expensive and seems very durable.

All you need for a wire bed is:
-A length of chicken wire, old fencing, or any metal mesh. All of these are frequently seen on the sides of roads or can be bought in 100 ft. lengths (~$35) from the local hardware store.
-Part of a bale of straw. Even our biggest bed barely used a whole bale. Also, I have a feeling that other materials would work (old grass clippings? leaves? palm fronds? very coarse wood chips??).
-Something to attach your mesh to itself. Hog clamps are ideal and inexpensive (under $10), but I am sure there are lots of different ways.
-Less time than it takes to build a lot of other beds.

As you can see, most of the above are inexpensive and can frequently be acquired for free as long as you keep your eyes open. Plus, this construction style is very flexible. Did I mention we made a gigantic kidney bean?

The Downsides:
The potential downsides to this bed are durability and drainage.

Although none of our beds have fallen apart yet, we are assuming that one of two issues will occur. Eventually the straw will break down and the soil will start falling out of the bed OR the wire will corrode and the whole bed will break open. However, neither of these have occurred yet and do not look as though the beds are starting to do either. We have the advantage of the dry environment here in the desert. The straw stays dry enough to slow down decomposition and it also keeps the metal on the outside from rusting apart.

This brings us to the downside of our dry environment. These beds have very porous edges and may require a lot more water to keep moist in the Arizona summer. Only our oldest bed was in place last summer and the plants in it did not do well. However, in our defense, that is because they were strawberries. It also was the smallest bed so it had a very high surface area to volume ratio. Ideally our larger circle should hold water very well. The straw on the outside of the bed acts as a very thick layer of mulch.


Overall, this is my new favorite method for bed construction. This passes up the old wooden beds because it is much, much cheaper and durable enough to last multiple years. For a lot of communities, it is hard to start a garden because of the high start up cost. Nobody knows if they will want to make a huge investment into something that might not work out. So these beds make it much easier. You can build a group of these beds for a fairly low start up cost and I wager they will last at least 2 years. In the next two years, you can find out how much your community likes gardening. If they like it, you can invest in the more durable wood beds.

Thanks for reading and let me know how your beds turn out.

Tuesday, April 3, 2012

April Fools' Cooking Class

The cooking class has not been getting much attention on the ECG blog, which is a shame because the garden and the cooking classes have been working together a lot recently. The cooking classes have been using a lot of the fresh produce from the garden and many of the recipes have been seasonally influenced. The cooking classes have also been emphasizing some of the vegetables that are less common in grocery stores. We're looking at you, chard.
By teaching recipes that use more whole vegetables, instead of canned veggies, the cooking classes have increased demand for the garden vegetables.

But on Monday, in honor of April Fools' day, we decided to change things up a little. I decided that it was time to teach class members how use one of the ingredients universally reviled by health conscious Americans:
Oh yeah, ramen noodles. The package you are looking at provides roughly 75% of the salt you need in a day along with some delicious MSG.

Other than the entertainment factor, there are a few reasons I wanted to teach a ramen noodle themed class. First, the TCAA food bank has a pile of ramen noodles taller than I am. They are definitely giving them out to neighborhood families, so I might as well create a curriculum for "responsible" ramen usage. Second, the cooking class emphasizes healthy food on a budget. In calculating a budget, I try to take into account time as well as the dollars and cents. Fortunately, ramen is great at both of these. The noodles cook faster than it took me to type this sentence.

The largest drawback to ramen, as I mentioned earlier, is the high salt content. Fortunately enough, all that salt comes in a convenient packet so that you can easily throw it away. So, to review, the first step in all of these recipes is to pitch the little salt packet.

Now then, on to the recipes we whipped up during our class: I ended up finding recipes that use ramen for a main course, a side dish, and a dessert.

Ramen Noodle and Vegetable Soup
This dish is not exactly a surprise. The cheap ramen noodles you find for fifty cents in a store are actually based on a style of soup that has existed for generations. In fact, there is a resurgence in ramen and many cities now have high-end ramen shops. We aren't attempting anything fancy with this recipe. If you want a truly traditional ramen recipe, google it. The recipe below is based on what was in the garden at the time, and a smattering of vegetables left over from previous cooking classes, as well as a few necessary additions (ginger and a little soy sauce).

In a large soup pot, begin to heat up:

· 6 cups stock (any stock will work)
· 4 cups water
Meanwhile, in 2 tbsp oil, sauté until soft:
· 6 garlic plants, chopped finely
· 1 leek, tough dark green end removed and finely chopped
· 1 onion, coarsely chopped
· 1 stalk celery, finely chopped
· 6 green peppers, finely chopped
Add sauteed vegetables to stock as well as:
· 3 tbsp ginger root, peeled and cut into very small pieces
· 4 bell peppers cut into bite size pieces
· 1 tbsp soy sauce
· Radishes, whole
· Mushrooms, whole
· 4 carrots, finely chopped
· A handful of turnips, trimmed and quartered
· 4 sliced chard stems
Boil above vegetables until they are tender (10-15 min.), turn off heat and add:
· 4 leaves of chard, coarsely chopped
· Spinach leaves, whole
· Radish greens
· 4 packets of ramen noodles
When leaves are wilted and the noodles are softened, serve topped with:

·
1 bunch of cilantro
· Limes, to taste

As you can see, this recipe is very flexible and was based on what we had at the garden and kitchen that day. Although it was delicious, I would not suggest trying to replicate it in any exact manner. However, you could take the idea and substitute out any vegetables in season in your area.

Ramen Cole Slaw
I have always found cole slaw a little boring. It is an easy way to use up cabbage, but hard to really do the cabbage justice. That is why I was surprised by this dish. Even without the ramen, this slaw was excellent. With the toasted ramen and almonds, this cole slaw recipe was worth putting on the fridge next to the picture of your kids.

Also, fresh cabbage helps much more than one would expect. I think there are more sugars in freshly picked cabbage and all that time on the shelf causes the cabbage to use them up. Now then, on to the recipe:

Ingredients

  • 2 tablespoons vegetable oil
  • 3 tablespoons vinegar
  • 2 tablespoons sugar
  • 1 package ramen noodles, crushed, (seasoning packet can probably be used to prop up a wobbly desk)
  • 1/2 teaspoon salt
  • 1/2 teaspoon ground black pepper
  • 1/4 cup sliced almonds
  • 1/2 medium head cabbage, shredded
  • 5 green onions, chopped

Directions

  1. In a medium bowl, whisk together the oil, vinegar, sugar, salt and pepper to create a dressing.
  2. Place crushed noodles and almonds in a frying pan. Roast in pan for 5 minutes until lightly brown.
  3. In a large salad bowl, combine the cabbage, endives, green onions crushed ramen noodles and almonds. Pour dressing over the cabbage, and toss to coat evenly.
Judging by how much of the slaw we went through, the cooking class members agreed with me.

Ramen Kugel
I am proud of this one. This Jewish dessert/side dish is the rare noodle-based pudding. It can be savory, but I went the sweet route. I did my best to keep the recipe healthy, which explains the yogurt (instead of traditional sour cream) and apple sauce.

I also substituted out the traditional egg noodles with ramen. Since ramen is actually cooked and then dehydrated noodles, this recipe is much faster than traditional kugel because you can mix in uncooked broken up ramen noodles instead of cooking a batch of noodles and adding them to the mix.

Also, for the sake of fitting the recipe into the class period, I made these in a muffin tin. If you pour the mixture into a square pan, the kugel should bake for 45-60 minutes.

Ingredients:

· 4 packets of ramen noodles, flavoring discarded
· ½ cup melted butter
· ½ cup yogurt
· 3 eggs
· 1 cup sugar
· 1 tbsp lemon juice
· 1 teaspoon vanilla extract
· 1 15 oz can applesauce
· ½ cup raisin (or figs, for our recipe)
· 1 teaspoon cinnamon

Directions:

· Preheat oven to 350°F.
· Break the noodles into smaller pieces and soak in enough water to cover while you assemble the remaining ingredients. (They should soak for at least 5 minutes)
· Butter the muffin tins.
· Mix the butter, yogurt, eggs, sugar, lemon juice, vanilla, applesauce, and raisins in a mixing bowl.
· Drain softened noodles and add to mixing bowl.
· Pour mixture into muffin tins and place in pre-heated oven.
· Bake for 25 minutes. Edges should brown slightly.


I hope you have found these recipes useful, or at least unique and entertaining. When planning this class, I was worried that the the dishes would be boring but all the food in the class turned out much better than I anticipated.